
Installing Odoo 16 for Development on Ubuntu 22.04 LTS Server
Detailed installation steps
Introduction
In this tutorial we will see how to install an Odoo 16 ERP CE server for development (Community Edition) on Ubuntu 22.04 LTS server.
Step-by-step Installation and Configuration of Odoo 16 on Ubuntu 22.04 LTS Server
These are the steps to follow to install Odoo in Version 16
Step 1: Upgrade the installed packages to the latest version
As in any installation procedure it is important to have the latest updates of the version we are using.
Use the instructions below to install the updates present in the Ubuntu Package Manager:
>sudo apt update
>sudo apt upgrade -y
Step 2: Create the Odoo User
Create an administrator level user for odoo with the following instruction:
>sudo adduser -system -home=/opt/odoo -group odoo
This creates the user 'odoo' and the group 'odoo'.
Step 3: Install PostgreSQL and the Odoo user for PostgreSQL
Odoo uses PostgreSQL as database server. To install it and create a user follow the instructions: :
>sudo apt install postgresql -y
>sudo chmod 700 -R /var/lib/postgresql/14/main/
>sudo su - postgres
Postgres>createuser - s odoo --pwprompt
Postgres>sudo systemctl restart postgresql
Step 4: Install Python PIP Python dependencies
Execute the following two instructions:
>sudo apt-get install git python3 python3-pip build-essential wget python3-dev python3-venv python3-wheel libxslt-dev libzip-dev libldap2-dev libsasl2-dev python3-setuptools node-less libjpeg-dev gdebi -y
>sudo apt-get install libpq-dev python3-dev libxml2-dev libxslt1-dev libldap2-dev libsasl2-dev libffi-dev python3-psutil python3-polib python3-dateutil python3-decorator python3-lxml python3-reportlab python3-pil python3-passlib python3-werkzeug python3-psycopg2 python3-pypdf2 python3-gevent -y
Step 5: Additional packages required
Odoo 16 requires Node.js. Execute the following instruction:
>sudo apt-get install nodejs npm -y
Install the language support or CSS from right to left with the following instruction, only if this support is needed.
>sudo npm install -g rtlcss
Step 6: Installation of WKHTMLTOX
Odoo 16 utiliza wkhtmltopdf para generar reportes en PDF. Para instalar el paquete siga las siguientes instrucciones.
Debemos instalar las dependencias xfonts en primer lugar:
>sudo apt-get install xfonts-75dpi xfonts-base -y
Use las instrucciones siguientes para bajar e instalar wkhtmltox:
>wget https://github.com/wkhtmltopdf/packaging/releases/download/0.12.6.1-2/wkhtmltox_0.12.6.1-2.jammy_amd64.deb
>sudo dpkg -i wkhtmltox_0.12.6.1-2.jammy_amd64.deb
Step 7: Create a log folder and set the appropriate permissions
The logs folder will contain the detail of the activities on the Odoo servers:
>sudo mkdir /var/log/odoo
>sudo chown odoo:odoo /var/log/odoo
Step 8: Creating the folder for the modules and downloading Odoo 16 Community
Create a folder in the home directory of the odoo user created in step 2.
>cd /opt/odoo
>sudo mkdir /opt/odoo/custom
Download Odoo Community from the git repository once you have installed the git package:
>sudo apt-get install git
>sudo git clone https://www.github.com/odoo/odoo /opt/odoo/odoo-server -b 16.0 --depth 1
Step 9: Assign Odoo user permissions
In this step we already have in /opt/odoo the folders:
- custom
- odoo-server
Asignar los permisos del usuario de Odoo del paso 2 a todos los archivos que bajamos de git y la carpeta de nuestros propios desarrollos:
>sudo chown -R odoo:odoo /opt/odoo/
Step 10: Create the configuration file
El archivo de configuración para el servidor de desarrollo contiene parámetros que instruyen al servidor sobre la estructura de los addons del sistema, puertos, cantidad de memoria y otros parámetros de funcionamiento.
The server installed in steps 8 and 9 comes with a standard configuration file in the folder:
[Server Folder]/debian
en este caso en el nombre y dirección del archivo es:
/opt/odoo/odoo-server/debian/odoo.conf
Copy the file to the folder: /etc
>sudo cp /opt/odoo/odoo-server/debian/odoo.conf /etc/.
>sudo chown odoo:odoo /etc/odoo.conf
>sudo nano /etc/odoo.conf
Complete the following parameters:
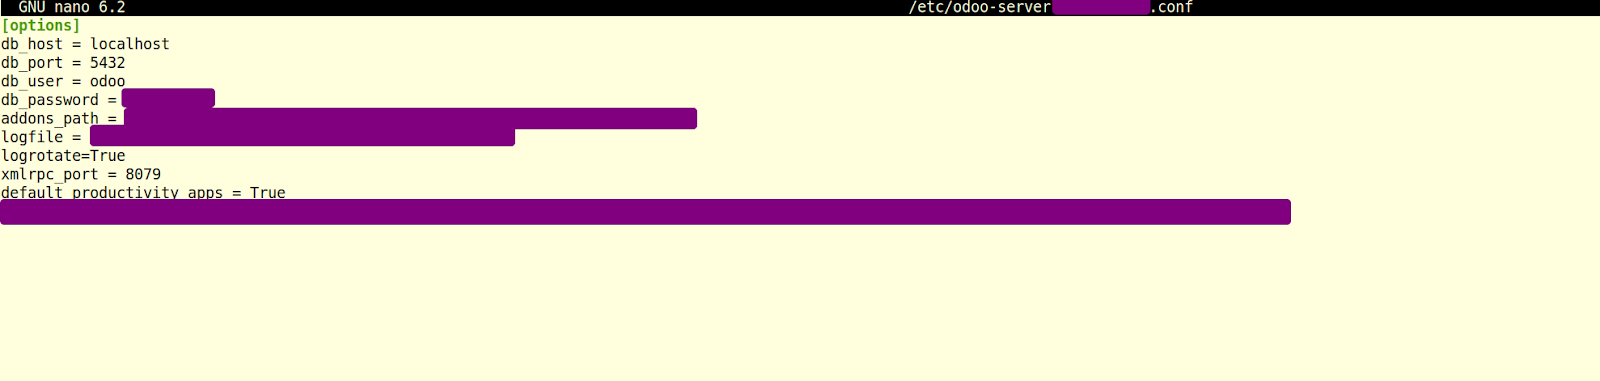
- db_host = localhost (preferably localhost, so we can keep the DB isolated)
- db_port = 5432 (postgreSQL standard port)
- db_user= odoo (user created in step 3)
- db_password = the password entered in step 3
- addons_path =/opt/odoo/odoo-server/addons, /opt/odoo/custom
- log_file = /var/log/odoo/odoo.log (the folder created in step 7)
- logrotate = True
- xmlrpc_port = 8079 (We change the default odoo port since this is a development server)
Assign permissions to the configuration file
>sudo chown odoo:odoo /etc/odoo.conf
>sudo chmod 640 /etc/odoo.conf
Step 11: Create a python virtual environment separate from the root installation
To prevent changes to the system's python base environment, create a virtual environment for odoo 16 by following the instructions below:
Switch to the odoo user from step 2
>sudo su -l odoo -s /bin/bash
>cd odoo-server
>python3 -m venv odoo-venv16
>source odoo-venv16/bin/activate
Now, install the Odoo16 pip package requirements to the created enviroment:
>pip3 install wheel
>pip3 install -r requirements.txt
Con la instrucción deactivate salimos del entorno virtual.
>deactivate
Step 12: Start Odoo Instance
Now that all the file structures, environments and dependencies are installed let's run the odoo script to launch the system:
>cd /opt/odoo/odoo-server
>source odoo-venv/bin/activate
>./odoo-bin -c /etc/odoo.conf
In any supported browser run: http://localhost:8079
After this last instruction you will be able to create a database to continue. If everything works correctly, you can shut down the server and launch it in the background with the command:
>./odoo-bin -c /etc/odoo.conf &
In another blog we will see how to install a database in production.
Empiece a escribir aquí...